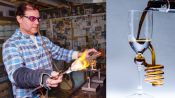
Scientific Glass Blower Makes Beer Glasses
Released on 05/13/2021
[flame blowing] [upbeat music]
You're playing with gravity, heat,
the strain point,
it's all such fun. [chuckling]
[fire blowing]
[Tim Voiceover] My name is Tim Drier,
I'm a scientific glassblower.
I work in scientific glass all day
and when I see the techniques
that I'm using,
I just thought to myself,
This would be the coolest drinking vessel I've ever seen,
why doesn't anybody ever do that?
So that's what we're doing today,
we're taking borosilicate glass tubing
and blowing it into barware re-imagined.
First, I'm gonna start by making the cups.
[gentle chime]
[glass clinking]
I start with a piece of 44 millimeter tubing,
I heat up a section.
[electronic music]
I close the end off.
[electronic music]
[fire blowing]
I punty up.
The punty is just an attachment
that's going to be removed at some point.
It's made out of borosilicate rod
because I want it to stick to the bubble
that I wanna help control.
[fire blowing]
And then I blow and stretch,
and push and pull into the shape of the cup
that I want.
When I blow a cup,
I'm spinning both hands roughly at the same speed,
in the same direction,
the same lateral pressure.
There's a lot that goes on
when you start getting a bubble soft.
[fire hissing]
[electronic music]
Okay, so now I'm gonna do a fire cut,
where I'm gonna heat just a real thin band of glass,
pull it, basically rip it open
and this will be the top of the cup.
[electronic music]
So now where this is tore,
there's gonna be a little blip
that I need to pick off of there, see it?
Right there.
That needs to come off there
otherwise it will just amplify
as you make the lip
or the foot.
[upbeat music]
Then I heat the whole lip evenly
and I use my graphite paddle
to push the rest of the glass back even,
and then my graphite rod to flare the lip even.
Graphite is used in glass blowing
because it can take a lot of heat
and it's pretty indestructible
when it comes to flames.
[fire blowing]
There you have it.
[Tim Voiceover] I can see that it's even, it's square,
and I usually pull it off on my punty handle
with a small sharp flame
and my tweezers.
Tweezers are extension of my fingers,
when I'm working,
I can't touch the glass so I use my tweezers.
[upbeat music]
So now I'm just closing off the end of the tube,
I'm gonna get rid of this raw end
and close the end of the tube.
[Tim Voiceover] I close off the end
and I peel off what bad glass is on the end
and then it seals off the tube again
so it allows me to blow another bubble.
I can work my way down
a whole six foot length of tube that way.
[fire hissing]
Borosilicate tubing is soda-lime glass,
with boron added to it,
it makes it a stronger, harder glass.
When flame working,
we work with a torch so it needs to be able
to go from room temperature
into a 3,000 degree flame
and other glasses can't do that,
that's why flame working
is different than furnace working.
Furnace working is where they take batch glass,
mix them in a big crucible,
add a bunch of heat,
and literally melt the glass,
and then they go in with steel pipes
and dip it out of the furnace,
and shape it,
and then put it right into an annealing oven.
So now I'm gonna heat this little section
and I'm gonna stretch it.
[Tim Voiceover] If you take chopsticks
and you put 'em in a bowl of honey,
and you roll it up,
and the thickness of the honey
builds a little ball on the end,
that's a lot what it feels like,
you're dealing with a really thick liquid
on the end of a tube
or a rod.
[upbeat music]
Now I'm gonna blow this up
and squash it a little.
[fire blowing]
[upbeat music]
[Tim Voiceover] I use quite a bit of heat,
3,200 degrees Fahrenheit
is the actual flame temperature.
The valves on the torch
are the control for the propane
and oxygen to give different flame intensities
and flame patterns.
There's the focused, wide, soft flame,
like when I blow a cup,
I use the outer fire to get more glass soft
so I can blow a bigger bubble.
And then there's a sharp, pointed,
center fire flame,
they're both roughly the same as far as heat-wise,
it's the volume of flame
that it gives.
[Woman] Do you have a smoke detector in there?
I do not,
I have a fire extinguisher.
So I gotta heat up a wide section
and then blow to shape the cup.
[Tim Voiceover] When the flame is blue,
it is the absolute hottest it can be,
because at that point,
you're burning two parts oxygen to one part gas.
The sodium that's in the glass is what's burning off,
that's the bright yellow you see,
it's called the sodium flare,
so the glass is actually giving some of its life away.
Overworking the glass can cause devitrification
because you burn all of the sodium out.
So you wanna try to work the glass
as little as possible
so that you maintain the integrity
and the chemical properties in the glass
that you need to keep it clear.
[fire blowing]
[funky music]
So now on this one,
I'm gonna put a flatter bottom here,
so I'm going to a sharper fire,
gonna heat up just this bottom section
and push this square shoulder.
[funky music]
[Tim Voiceover] While I'm working,
I wear didymium glasses,
they're made out of a material called neodidymium
and they filter out
the sodium wavelength in the flame,
which is the bright yellow,
and it allows me to see
into the wall thickness
of the glass when I'm heating it.
[funky music]
I wear a Kevlar sleeve on my right arm
to protect me from the heat,
if you have long sleeves on,
cotton could potentially catch on fire,
so I try not to catch myself on fire.
Things have gotten kinda cool down here on the end,
so I wanna make sure
that I'm not letting them get stone cold.
It's a technique called flame annealing,
I wanted to warm everything back up
roughly the same temperature
to help it equalize.
[fire blowing]
Now I'm gonna go into a fire cut,
another fire cut.
And I go to an overhand rotation
instead of an underhand as I'm pulling.
[funky music]
[Tim Voiceover] When I'm just blowing a bubble,
I prefer the underhand technique
because I feel I'm in more control of the rotation.
When I do the fire cut,
I need to keep things even playing,
I have a lot more control in
that respect when I'm overhand.
[fire hissing]
[fire blowing]
[glass clinking]
The glass gets soft at around 1100, 1200 degrees,
and you gotta be careful
because you can boil the glass.
Where the surface of the glass
will literally start to boil,
you're getting it so hot.
[fire blowing]
So that's why the even rotation
of the glass is important,
to get the even heat all the way around.
If I was to just stand still,
the glass would boil in that spot
where the torch was hitting it
and it would fall to the ground.
[fire hissing]
[upbeat music]
Right where the heat hits the tubing is the hottest.
So when I come out of the flame,
you'll see me just let it rotate,
I'm letting the heat equalize.
[fire blowing]
Because it'll have a hot spot,
and if I start blowing right away,
it will blow out of round
and blow uneven,
so you need to give the heat time
to equalize in the tubing
and then you blow very slowly,
and that's the key to blowing a good cup.
[fire hissing]
[fire blowing]
All three cups are complete.
[glass clinking]
Next I'm going to make a foot
for each one of my cups.
[upbeat music]
I make a foot by closing off the end,
attaching my punty
or my handle,
and then I blow a small squatty bubble.
A squatty bubble is a bubble
that's just basically compressed to oblong shape.
[fire hissing]
Do a fire cut.
[fire blowing]
I use the graphite rods
and my graphite paddle
to flare my foot to the flatness
that I want.
[gentle music]
Sometimes the foot has an uneven edge to it,
sometimes I go down on my graphite block
and it helps even that out,
so it makes it so the cup isn't going to be rocky.
And then I just pull it off the punty.
[glass clinking]
[gentle chimes]
Next, we're gonna wrap some coils.
I'm using a smaller diameter tubing,
and I'm wrapping it around a graphite mandril
to give me the shape
and size that I want.
[upbeat music]
You're feeding your tubing in
over the top of the mandril
and everything comes together,
it is almost magical,
because the tubing is just soft enough,
cools enough when it touches the mandril,
and it just happens all by itself.
The graphite expands probably two
to three times farther than the glass does,
so as it cools,
it's gonna shrink twice as much.
It will shrink down
and allow the glass to slide off.
And now for the fun part,
we're going to assemble the coil, the foot,
and the cup altogether.
[upbeat music]
I've sketched out what I want the cups to look like,
but this is where the tricky parts are.
I'm cutting the coils
to give me sections of workable size,
I cut the coils using a tungsten carbide blade,
a really hard metal,
so it scratches the glass,
and with pressure on the back side,
causes the glass to break in an even way.
So now I'm just pulling a hole
in the ring 'cause I need to be able
to blow this together
when I seal this end off.
And I take my piece of six millimeter,
and I seal
that temporary blow pipe.
And then where I scratch cut it,
it has carbide in there
and it'll leave a dirty spot in the clear glass,
so I peal that little piece off.
And then I heat the whole thing
to soften it so I can go on my graphite,
flatten it flat.
[fire hissing]
So now I need to pick these edges together,
carefully stitch it up.
[fire hissing]
[gentle music]
[Tim Voiceover] The hand torch is extremely portable,
it's a very condensed, small flame.
I use the hand torch for small seals,
doing very concentrated small work.
Okay, so that one I'm gonna put on there like that,
so I'll bend it just a little bit.
So now I need to do the same thing with this one,
so I have a pair.
Ready to put this one together.
[fire blowing]
[Tim Voiceover] The plural stopper is just a big stopper
and I use it as a holder with a handle
so I can put my cups on it
and hold them in the flame
and still be able to blow.
I use the small hand torch to heat
just a very small piece of the glass,
I blow a blister,
it looks like a blister,
and then I pop that open,
and then I'm ready to seal on
any kind of sidearm or connection.
[fire hissing]
I'm still blowing while I'm attaching things
so they don't constrict close,
because when you seal the glass together
and heat it,
it wants to gather onto itself or constrict,
and the air pressure inside it allows me to blow
and flow that wall thickness even
from where I'd made my attach.
I have to keep the cups
and the feet
and the coil
and everything above 490 degrees
which is the strain point,
'cause if you fall below that,
is when things can crack.
So once I warm things up
and get everything hot,
I need to stay there while I'm doing my seals.
[fire hissing]
[gentle music]
[fire blowing]
My favorite part is the assembly,
no, it is,
I get in a trance
and I can feel the way the wall thickness...
I can't explain it,
I love every part of the assembly process.
[gentle music]
And I'm kind of that guy
who's pushing all the boundaries
where I don't really care what people think,
or whether it's even practical,
or whether you can ever use it again,
it's just exciting for me.
[fire hissing]
After I've worked it,
there'll be really thin spots on a cup
and then a real thick spot down by the stem
because the glass is cooling at different rates
when it's thick and thin.
I need it to go in the oven,
whether it's now.
[upbeat music] [glass clinking]
[Tim Voiceover] When you put things in the annealing oven,
they heat up all the molecules evenly
and it cools them all back down,
so it heats up 565 degrees centigrade,
and hold it for around 15 to 20 minutes
to allow everything to equalize,
and then you can cool back down
through the 490 temperature range,
the strain point.
My annealing oven,
that process usually takes about an hour,
hour and a half to get up to temperature
and then about another two
or three hours to cool down.
Depending on your oven,
if you have a brick oven,
it will hold the heat longer,
if you have a Fiberfrax oven,
it will cool a lot faster.
I have one that's fire break,
so it holds the heat longer
and it's more of a ramp down cooling
versus a shelf drop-off cooling.
[upbeat music]
You have scientific glass
which is used in research, chemistry,
but yet nobody's ever brought
that same material into a bar glassware,
decanter type of scene,
you have very distinctive lines between
the glass you see in a bar
and the glass you see in a research lab,
why can't it all be together?
[upbeat music]
Forensics Expert Explains How to Determine Bullet Trajectory
Forensics Expert Explains How to Analyze Bloodstain Patterns

Forensics Expert Explains How to Lift Fingerprints

Accent Expert Explains How to Tell Accents Apart

Accent Expert Explains Similarities Between Different Accents
Surgeon Explains How to Tie Surgical Knots
Scientific Glass Blower Makes Beer Glasses
Spy Satellite Expert Explains How to Analyze Satellite Imagery

The Surface Book Really Is the Ultimate Laptop

Gear Review | Apple ipads Pro